apache

apache软件学习

基础简介

  1. linux下常用web服务器软件:Apache

注:windows server使用的web服务器软件叫 web服务器(IIS)

  1. Apache主程序名称:httpd
  2. Apache主配置文件:/etc/httpd/conf/httpd.conf

Apache配置文件解析

基本概念

Apache的配置文件,除了注释之外,主要由指令容器组成

(语法格式详见语法描述格式

指令语法: <指令名> [参数]

容器语法:

1
2
\<<容器名> [参数] \>
\</<容器名> \>

例:(出现的容器和指令及其参数的具体含义此处暂不讲解,只展示一下形式)

1
2
3
4
5
6
7
<Directory />
#容器名是Directory 参数是/
AllowOverride none
#指令是AllowOverride 参数是none
Require all denied
#指令是Require 参数是all denied
</Directory>

配置文件里直接出现的指令作用于全局,

在容器内出现的指令作用于父容器,

Apache的容器和指令是不区分大小写的,指令名和容器名组成单词的首字母大写是一个良好的语法书写习惯

虚拟主机及主机概念

Apache的多站点是通过虚拟主机完成的,

Apache的虚拟主机体现在其配置文件的<VirtualHost></VirtualHost>容器内

逻辑上虚拟主机物理主机(Apache中主机的概念在后面)是同级的,绝大多数配置项都是相同的

图例:

注:黄色框表示文件,绿色表示文件内容,蓝色框表示容器,紫色表示容器内容
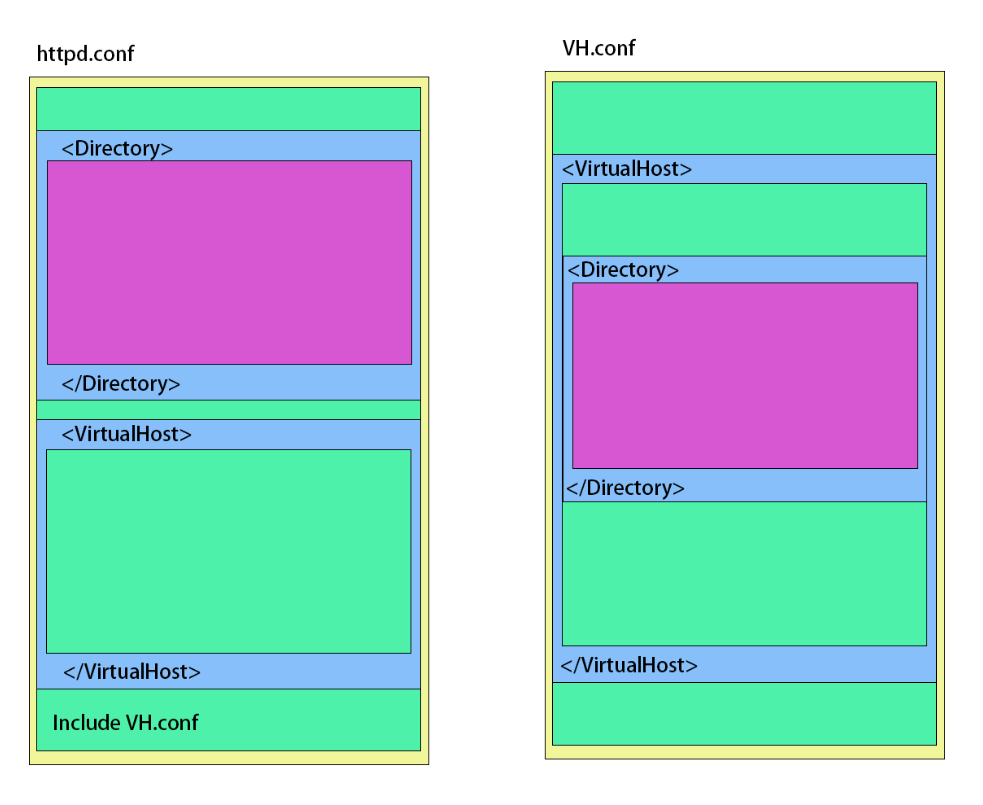
image-20220314203259341

关于VirtualHost,它也是容器,但它的内容同时可视作和文件内容(物理主机全局域)同级,

物理主机有且只有一个,虚拟主机可以没有或者存在多个,

关于Apache的主机

Apache是一个提供web服务的软件,

它的主机概念在逻辑上即是指一个提供web内容的服务器,

所以这个主机最核心的几点配置就是它的:IP、端口、域名、主目录

并且如同一般的常识一样,端口可以缺省,默认是80,域名可以根据实际情况决定有或者没有,

物理主机的配置就是Apache配置文件的内容,也就是全局配置

虚拟主机的配置就是虚拟主机容器<VirtualHost></VirtualHost>的内容,

有多少个虚拟主机容器就有多少个虚拟主机(假设都配置无误,不冲突,都有效),

声明:

  1. 下文中,若无需特别指出时,统一使用主机,主要是便于讲解指令和容器,具体是指物理主机还是虚拟主机要根据实际情况而定,需要指出时,会使用术语物理主机和虚拟主机
  2. 为避免冲突,使用服务器来表示运行CentOS7、运行Apache的机器

指令:Listen

语法:Listen [<域名><:>]<端口号>

作用于物理主机

语义:让Apache监听指定的端口,或者特定的IP上的端口

例:

1
2
3
Listen 80
#监听访问所有IP上80端口的请求
#相对于Windows Server里的绑定*:80
1
2
3
Listen 192.168.1.112:80
#监听192.168.1.112上80端口的请求
#相对于Windows Server里的绑定192.168.1.112:80

错误示例:

1
2
3
Listen 80
Listen 192.168.1.112:80
#既设置了监听所有,又设置监听特定IP,这两个设置冲突了

改正:

1
2
3
4
5
6
#Listen 80
Listen 192.168.1.112:80
#可以把监听所有的配置指令删除或者注释掉,使之无效,
#虽然监听所有是可以达到监听特定IP的目的的,
#但这样会使安全性失去控制,是不安全的,
#管理员应该在配置的同时尽可能注意安全性,手动添加监听特定IP和端口

可以抽象的理解为一个Apache自己的一个简单的防火墙,

只有用监听到了,Apache才能收到访问请求,

Listen 192.168.1.112:80就像是让Apache自己的防火墙放行192.168.1.112,80端口

指令:ServerRoot

语法:ServerRoot <绝对路径>

作用于主机

语义:将制定的绝对路径设置为主机的配置根路径

配置文件里出现的服务器中的路径可以直接使用绝对路径,也可以使用相对于配置根路径的相对路径

例:见下文指令:Include

指令:ServerName

语法:ServerName <IP>|<域名>[<:>端口号]

作用于主机

语义:给主机绑定上指定的IP或域名,可同时绑定端口号

注:客户端访问服务器时使用的URL服务器是能知道的,所以虽然可以让多个域名指向同一个IP,

但是服务器是能区分访问时使用的不同的域名的,通过URL域名访问和ServerName绑定域名的配合能实现基于域名的多站点

指令:DirectoryIndex

语法:DirectoryIndex <文件路径>

作用于目录容器(见下文容器:Directory

将指定的文件设为默认文档,可以有多条,要注意顺序,

一般是出现在Directory容器内,文件路径通常使用相对路径,相对于Directory的路径

例:

1
2
3
4
5
6
7
8
9
<Directory "/var/www/html">
DirectoryIndex index.html
DirectoryIndex index.php
DirectoryIndex index.htm
</Directory>
#配置效果相当于Windows Server设置默认文档列表
#1.index.html
#2.index.php
#3.index.htm

指令:Include

语法:Include <文件匹配器>

作用于配置文件(物理主机)

文件匹配器:用于定位要包含的配置文件,可以直接用绝对路径,或者使用相对于配置根路径的相对路径,可以使用通配符?*,因为空格意为分隔参数,所以如果路径里包含空格,要用双引号引起来,视作一整个字符串,而不是两个或多个参数

示例:

1
2
Include "/etc/httpd/customed.conf"
#即包含"/etc/httpd/customed.conf"文件
1
2
3
ServerRoot "/etc/httpd"
Include "vhost/vhost112.conf"
#即包含"/etc/httpd/vhost/vhost112.conf"文件
1
2
3
ServerRoot "/etc/httpd"
Include "vhost/*.conf"
#即包含"/etc/httpd/vhost/"目录下所有文件名以.conf结尾的文件

关于Include包含的简易抽象理解:(和C语言里的include预编译指令是一样的)

为了便于理解,配置内容很简单,可能不严谨,会存在冲突,实际运行可能报错,

假设不会报错,服务器会正常启动,

首先,编辑默认的Apache主配置文件/etc/httpd/conf/httpd.conf,使其内容如下:

1
2
3
4
5
ServerRoot "/etc/httpd"
ServerName www.learn.org
DocumentRoot "/var/www/html"
Include "vhost/vhost112.conf"
abcdefg

然后建立并编辑/etc/httpd/vhost/vhost112.conf

1
2
3
<VirtualHost 192.168.1.112>
DocumentRoot "/var/www/112"
</VirtualHost>

那么在启动Apache服务器后,程序的配置内容会是以下这样:

1
2
3
4
5
6
7
ServerRoot "/etc/httpd"
ServerName www.learn.org
DocumentRoot "/var/www/html"
<VirtualHost 192.168.1.112>
DocumentRoot "/var/www/112"
</VirtualHost>
abcdefg

也就是说,Include会把定位到的文件内的字符全部插入到Include指令所在的位置,

可以在其它配置文件中使用Include指令,效果同上,

总而言之Apache是从主配置文件读起的,可以使用Include指令很便捷的扩展和通过加#注释掉来取消扩展

指令:AllowOverride

语法:AllowOverride <None>|<All>

作用于目录容器

这个东西通常不必深究,

主要是了解一下有这东西就行,Allow是允许,Override是重载,或者覆盖

它有默认值,但是版本不一样默认值不一样,还是指定出来保险一点,

主要是要知道:

  1. 它一般出现在目录容器里面
  2. 要给某个目录配置规则,有两种方法:
    1. 可以在配置文件里面使用目录容器,在容器里使用指令指定规则
    2. 可以直接在目录下新建一个文件.htaccess,在这个文件里配置规则

若在配置文件的容器里指定了AllowOverride None,也就是不允许被覆盖,那么对应的.htaccess便不会生效,甚至可能不会被读取

若在配置文件的容器里指定了AllowOverride All,也就是允许被覆盖,那么如果对应的目录里有.htaccess文件,则文件中的配置会出现在Apache的配置中

因为使用.htaccess它有个读取和再处理的过程,会有点降低服务器性能,并且我们是可以在配置文件里完成这些配置的,至于.htaccess是为了适应什么环境而使用的,在中学阶段不必深究,所以通常建议指定AllowOverride None

指令:Require

作用于目录容器

这个指令也是不需要深究的,记住几个固定形式及其含义就行,

1
2
3
4
5
6
Require all granted
#访问无条件允许
Require all denied
#访问无条件拒绝
Require user username1 username2 ...
#仅允许指定的用户访问

容器:Directory

语法:

1
2
\<Directory <服务器路径> \>
\</Directory \>

语义:

容器内的指令会作用于指定的服务器路径

示例:

1
2
3
4
5
6
7
8
9
<Directory "/var/www/html">
AllowOverride None
Options Indexes FollowSymLinks
Require all granted
</Directory>
#容器内出现的三条指令都是作用于"/var/www/html"目录及目录下的文件的
#假设该容器的主机绑定了域名www.learn.org,端口是80,设置主目录为"/var/www/html"
#那么访问"http://www.learn.org/index.html"时,其文件本质是服务器上的"/var/www/html/index.html"
#此时该容器内的指令会起作用

容器:Location

语法:

1
2
\<Location <URL中的路径> \>
\</Location \>

语义:

容器内的指令会作用于指定的URL中的路径

示例:

1
2
3
4
5
<Location "/data">
ErrorDocument 403 /.noindex.html
</Location>
#假设该容器的主机绑定了域名www.learn.org,端口是80,
#那么在访问"http://www.learn.org/data"路径及其子路径比如"http://www.learn.org/data/picture.jpg"时,容器内的指令会起作用

容器:VirtualHost

语法:

1
2
\<VirtualHost <IP>|<域名>[<:>端口] [<IP>|<域名>[<:>端口]] ...\>
\</VirtualHost \>

如同虚拟主机中提到的:主机最核心的几点配置就是它的:IP、端口、域名、主目录

在这个容器的参数里,可以给虚拟主机提供它的IP或者域名,和端口号,并且可以有多条,至少有一条

例:

1
2
3
4
5
6
7
8
9
<VirtualHost 192.168.1.112:80>
</VirtualHost>
#建立了一个可以使用IP192.168.1.112,端口80的虚拟主机
<VirtualHost www.learn.org:80>
</VirtualHost>
#建立了一个可以使用域名www.learn.org,端口80的虚拟主机
<VirtualHost www.data.org:80>
</VirtualHost>
#建立了一个可以使用域名www.data.org,端口80的虚拟主机

注意:Apache中,物理主机直接使用物理网卡的配置,所以不用像虚拟主机一样要在参数里提供IP以供使用,即使用的是基于域名的虚拟主机,域名的本质也算是一个指向某IP的指针,

所以如果虚拟主机要用IP192.168.1.112:80,一定要在虚拟主机容器之前先Listen 192.168.1.112:80

Listen就像是一个声明:“我会用到的,你先听着”,要先声明才能用,

如果没有Listen,不会报错,但是很显然这会访问不到,

或者在虚拟主机容器里面Listen,语法上是不通的,会报错,并且这就好像先用再声明,就像是“啊管它有没有,反正我要用这个”,这很显然也是不行的

例:

1
2
3
4
5
6
7
8
9
10
Listen 192.168.1.113:80
<VirtualHost 192.168.1.113:80>
ServerName 192.168.1.113
DocumentRoot /var/www/113
<Directory /var/www/113>
AllowOverride none
DirectoryIndex index.html
Require all granted
</Directory>
</VirtualHost>

这是一个正确示例

httpd配置示例及解析

以*红字加一对星号*显示的字段在解析下能找到对应条目

服务器环境描述

硬件配置:不赘述,假设够用

软件配置:

  1. 系统:CentOS 7
  2. 学习阶段,为减少细枝末节的各种问题,关闭防火墙
  3. 网卡:
    1. 网卡名:ens33
    2. 使用手动配置IP
    3. IP:192.168.1.123
    4. NetMask:255.255.255.0
    5. GateWay:192.168.1.1
  4. 规划web内容放在/var/www
  5. 规划配置根路径为/etc/httpd

示例

常规web网站

目标:使用本机IP192.168.1.123搭建web站点,使用默认端口,要求可以直接使用http://192.168.1.123访问到默认文档index.html

  1. 准备工作:确认IP配置无误
  2. 准备工作:建立web内容

使用默认的web主目录路径/var/www/html

建立index.html文件,并编辑内容,

1
echo web测试>/var/www/html/index.html
  1. Apache配置文件编辑

    1. 让Apache能监听到访问请求

    编辑Apache主配置文件,确认已经注释掉监听所有,然后添加监听**(配置文件里其他的内容不用管它,只要找到要改的内容然后修改就好了)**

    1
    2
    #Listen 80
    Listen 192.168.1.123:80
    1. 绑定IP和端口

    编辑Apache主配置文件,找到原有的ServerName指令位置,若没有就添加,有就只修改或者注释掉再添加,

    一般会有一行#ServerName www.example.com:80是主配置文件默认的,已经是注释了

    1
    2
    #ServerName www.example.com:80
    ServerName 192.168.1.123:80
    1. 设置主目录

    编辑Apache主配置文件,一般会有一行DocumentRoot "/var/www/html"

    如果确认是就完成了,若不是就修改

    1
    DocumentRoot "/var/www/html"
    1. 设置默认文档

    编辑Apache主配置文件,一般会有一行<Directory "/var/www/html">

    没有就添加一个容器,然后在里面加上指令

    1
    2
    3
    <Directory "/var/www/html">
    DirectoryIndex index.html
    </Directory>
    1. 一些常规配置

    编辑Apache主配置文件,一般会有一行<Directory "/var/www/html">

    没有就添加一个容器,然后在里面加上一些常用的指令

    1
    2
    3
    4
    <Directory "/var/www/html">
    AllowOverride None
    Require all granted
    </Directory>
    1. 配置完成,检查

    按照如上配置,则编辑完成后,配置文件里至少应该有以下内容:

    1
    2
    3
    4
    5
    6
    7
    8
    Listen 192.168.1.123:80
    ServerName 192.168.1.123:80
    DocumentRoot "/var/www/html"
    <Directory "/var/www/html">
    DirectoryIndex index.htm
    AllowOverride None
    Require all granted
    </Directory>
  2. 检验

打开web浏览器,输入URLhttp://192.168.1.123

若能看到出现web测试即为配置成功
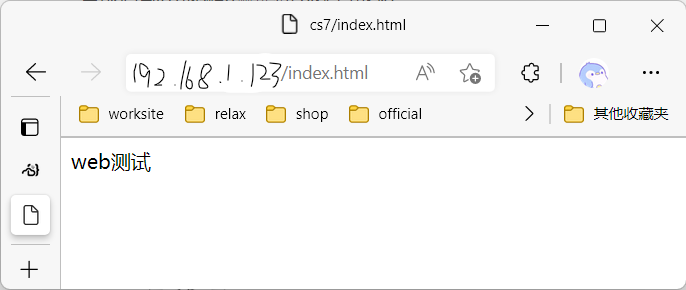
image-20220315202806437

基于IP地址的虚拟主机配置

  1. 准备工作:绑定IP

要配置基于IP的多网站,就需要有多个IP,

在linux下,可以进行*对一个物理网卡绑定多个虚拟IP*

给网卡再绑定两个IP

1
2
ifconfig ens33:0 192.168.1.112/24
ifconfig ens33:1 192.168.1.113/24
  1. 准备工作:建立web内容

新建两个文件夹,在两个文件夹里分别新建index.html,然后写入不同的内容以区分不同的网站,

1
2
3
4
5
6
7
8
9
10
11
12
13
14
15
16
17
18
19
20
21
22
23
24
mkdir /var/www/112
mkdir /var/www/113

#关于建立文件可以使用的方法有很多,方法1可以直接复制过去用,方法2展示常规的,看懂了可以直接往后面步骤走,有兴趣且有空可以看看其他方法
#方法1
echo 112目录的默认文档 >/var/www/112/index.html
echo 113目录的默认文档 >/var/www/113/index.html

#方法2
touch /var/www/112/index.html
touch /var/www/113/index.html
gedit /var/www/112/index.html
#打开后写入“112目录的默认文档”
gedit /var/www/113/index.html
#打开后写入“113目录的默认文档”

#方法3
gedit /var/www/112/index.html
gedit /var/www/113/index.html
#注:可以直接编辑,如果是不存在的文件,保存即自动创建,除非没有权限

#方法4
vim /var/www/112/index.html
vim /var/www/113/index.html
  1. Apache配置文件编辑

    1. 检查基础配置

    在主配置文件找到以下指令,并检查是否无误,有误差的要修改

    1
    2
    #Listen 80
    ServerRoot "/etc/httpd"
    1. 让Apache能监听到访问请求

    编辑Apache主配置文件,确认已经注释掉监听所有,然后添加监听

    1
    2
    3
    #Listen 80
    Listen 192.168.1.112:80
    Listen 192.168.1.113:80
    1. 建立虚拟主机

    可以直接在Apache主配置文件里添加虚拟主机容器,但是为了便于管理,避免主配置文件过于臃肿导致不便维护,先在主配置文件里使用Include指令进行扩展,然后使用独立文件进行虚拟主机的配置

    在主配置文件末尾添加:

    1
    Include "vhost/*.conf"

    编辑完后主配置文件里至少应该有以下内容:

    1
    2
    3
    4
    5
    ServerRoot "/etc/httpd"
    #Listen 80
    Listen 192.168.1.112:80
    Listen 192.168.1.113:80
    Include "vhost/*.conf"

    新建/etc/httpd/vhost目录,在目录下新建文件112.conf和113.conf,分别编辑

    112.conf:

    1
    2
    3
    4
    5
    6
    7
    8
    9
    <VirtualHost 192.168.1.112:80>
    ServerName 192.168.1.112
    DocumentRoot /var/www/112
    <Directory /var/www/112>
    AllowOverride none
    DirectoryIndex index.html
    Require all granted
    </Directory>
    </VirtualHost>

    113.conf:

    1
    2
    3
    4
    5
    6
    7
    8
    9
    <VirtualHost 192.168.1.113:80>
    ServerName 192.168.1.113
    DocumentRoot /var/www/113
    <Directory /var/www/113>
    AllowOverride none
    DirectoryIndex index.html
    Require all granted
    </Directory>
    </VirtualHost>
    1. 配置完成,重启Apache,更新配置文件
    1
    2
    3
    4
    5
    6
    7
    #方法一
    systemctl restart httpd
    #在CentOS7.x及更高版本中,使用systemctl全线代替了以往旧版里老式的管理工具,如service,chkconfig等

    #方法二
    service httpd restart
    #虽然已经有了更系统化,更高效的方法,但对于老式的方法依然实现了向下兼容,仍然可以使用

    使用命令后,如果没有消息出现就是成功了,

    linux的哲学即没有消息就是好消息

  2. 检验

啊,,检验就像上一个一样,打开网站看看对不对就行了

基于端口的虚拟主机配置

因为前一个例子已经讲的差不多了,后面的大同小异,大部分内容就略了,多参考上一个例子,

关于指令和容器有不懂的就回去看Apache配置文件解析

  1. 建立web内容
1
2
3
4
5
#直接放命令了,可以直接复制粘贴用,其他方法见上一例子
mkdir /var/www/port8000
mkdir /var/www/port9000
echo 8000端口目录的默认文档 >/var/www/port8000/index.html
echo 9000端口目录的默认文档 >/var/www/port9000/index.html
  1. Apache配置文件编辑

    1. 确认主配置文件内容,有误差就改:
    1
    2
    3
    4
    5
    ServerRoot "/etc/httpd"
    #Listen 80
    Listen 192.168.1.123:8000
    Listen 192.168.1.123:9000
    Include "vhost/*.conf"
    1. 建立虚拟主机

    怎么建文件和怎么编辑就略了,详见上一例子,换汤不换药,

    主要是注意要指定端口,

    假设用8000.conf和9000.conf

    /etc/httpd/vhost/8000.conf:

    1
    2
    3
    4
    5
    6
    7
    8
    9
    <VirtualHost 192.168.1.123:8000>
    ServerName 192.168.1.123:8000
    DocumentRoot /var/www/port8000
    <Directory /var/www/port8000>
    AllowOverride none
    DirectoryIndex index.html
    Require all granted
    </Directory>
    </VirtualHost>

    /etc/httpd/vhost/9000.conf:

    1
    2
    3
    4
    5
    6
    7
    8
    9
    <VirtualHost 192.168.1.123:9000>
    ServerName 192.168.1.123:9000
    DocumentRoot /var/www/port9000
    <Directory /var/www/port9000>
    AllowOverride none
    DirectoryIndex index.html
    Require all granted
    </Directory>
    </VirtualHost>
    1. 重启Apache
    1
    2
    3
    systemctl restart httpd
    #或者
    service httpd restart

站点配置,也就像这个例子里省略的这样,只是几条简单的命令,几十个或者几百个字符,

在熟练之后……嗯

基于域名的虚拟主机配置

  1. 准备工作:绑定域名

方便起见,直接编辑*hosts文件*

编辑/etc/hosts,在末尾添加:

1
2
192.168.1.123	www.web1.com
192.168.1.123 www.web2.com
  1. 建立web内容
1
2
3
4
mkdir /var/www/web1
mkdir /var/www/web2
echo web1的默认文档 >/var/www/web1/index.html
echo web2的默认文档 >/var/www/web2/index.html
  1. 编辑Apache配置文件

/etc/httpd/conf/httpd.conf

1
2
3
4
ServerRoot "/etc/httpd"
#Listen 80
Listen 192.168.1.123:80
Include "vhost/*.conf"

/etc/httpd/vhost/web1.conf

1
2
3
4
5
6
7
8
9
<VirtualHost www.web1.com>
ServerName www.web1.com
DocumentRoot /var/www/web1
<Directory /var/www/web1>
AllowOverride none
DirectoryIndex index.html
Require all granted
</Directory>
</VirtualHost>

/etc/httpd/vhost/web2.conf

1
2
3
4
5
6
7
8
9
<VirtualHost www.web2.com>
ServerName www.web2.com
DocumentRoot /var/www/web2
<Directory /var/www/web2>
AllowOverride none
DirectoryIndex index.html
Require all granted
</Directory>
</VirtualHost>
  1. 重启Apache,然后打开浏览器访问网站测试一下

Apache的用户授权控制

这一部分主要是展示怎么使用Apache的用户授权控制,就不赘述建立web站点了,关于建立web站点参见基于IP地址的虚拟主机配置

目标:对192.168.1.112虚拟主机启用用户授权控制,要求可以使用用户名student和web登陆,密码都设置为123

编辑/etc/httpd/vhost/112.conf,下面会出现几个新的命令,因为这些命令形式很单一,也几乎不会牵扯到别的,只有在要用到用户授权控制时用到,就不单独在配置文件解析里面列出来了,后文直接附上

1
2
3
4
5
6
7
8
9
10
11
12
13
14
15
16
<VirtualHost 192.168.1.112:80>
ServerName 192.168.1.112
DocumentRoot /var/www/112
<Directory /var/www/112>
AuthName "这一行会在认证窗口出现"
AuthType Basic
AuthUserFile /etc/httpd/passwd
#设置认证文件的路径为/etc/httpd/passwd
Require user student web
#要求使用用户student或者web登陆
AllowOverride none
DirectoryIndex index.html
#Require all granted
#请求全部准许的话,要求登陆就被无效了
</Directory>
</VirtualHost>

Auth应该是Authority的截短缩写,其他单词就字面意思了

AuthName <一串提示>这个指令将会让指定的一串提示出现在认证弹窗内(事实上好像只有IE浏览器支持这个,其他浏览器也许会有弹窗,但不会出现里面的字,就当走个流程)

AuthType Basic中学阶段应该只会用到这一种,指定认证类型为基本认证

AuthUserFile <由htpasswd建立的密码文件的路径>指定密码文件的路径,这个密码文件是由*htpasswd命令*生成的,

以上就是全部内容,只要加上新出现的四条指令,记得把Require all granted给注释掉,然后重启Apache,用户授权控制就开始工作了,可以试着访问http://192.168.1.112/试试,也可以直接看看直接使用带用户名和密码的URLhttp://student:123@192.168.1.112/

因为通常浏览器会记录登陆信息,所以可能在登陆过一次之后就不再要求认证了,所以要记得删除记录再重新测试

或者先用带用户名和密码的URL,再直接只用IP访问

解析

关闭防火墙

先编辑linux防火墙的配置文件/etc/selinux/config
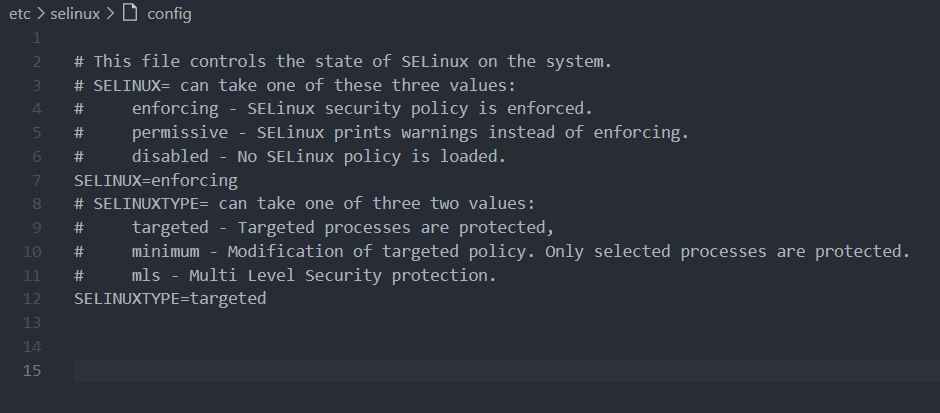
image-20220315220600371

编辑的方法很多,gedit,vim,…就不赘述了

总之把第7行那里的SELINUX=enforcing改成SELINUX=disabled就行了,保存编辑,

然后使用命令禁止防火墙开机自启

1
systemctl disable firewalld

再重启一次操作系统,然后防火墙就已经是关闭了

对一个物理网卡绑定多个虚拟IP

使用的命令是ifconfig

语法为:ifconfig <网卡名>:<编号x> <要绑定的虚拟IP>/<子网前缀长度n>

注:

  1. 编号x从0开始,0,1,2,3,4依此类推
  2. 子网前缀长度n是指就是指IP中网络号的位数,即子网掩码里二进制位为1的个数,比如子网掩码255.255.255.128的子网前缀长度是25

使用示例:

1
2
3
4
ifconfig ens33:0 192.168.1.112/24
#给ens33网卡绑定了IP 192.168.1.112,子网掩码为255.255.255.0,占用编号0
ifconfig ens33:1 192.168.1.113/24
#给ens33网卡绑定了IP 192.168.1.113,子网掩码为255.255.255.0,占用编号1

hosts文件

DNS解析的过程里,有一个很重要的一环,

主机先检查hosts文件,如果找不到解析再找本地缓存,再找不到才会向DNS发起查询,

hosts文件的优先级是很高的,

一般在Windows下的路径是C:\Windows\System32\drivers\etc\hosts

在linux下的路径是/etc/hosts

它们的语法都是一样的:

1
2
<IPv4>|<IPv6> <域名>
#一条一行

例:

1
2
192.168.1.123 www.web1.com
192.168.1.123 www.web2.com

即建立了两条域名解析记录,分别是:

www.web1.com ==> 192.168.1.123

www.web2.com ==> 192.168.1.123

htpasswd命令

安装Apache后会自带的一个命令

语法:htpasswd [-c] <加密文件路径> <用户名>

选项-c是指Creat,在还没有加密文件时,也就是第一次创建时,带上这个选项自动创建加密文件,名字是自定义的,不过一般都会用passwd或者password,便于理解和记忆

例:

1
2
3
4
5
htpasswd -c /etc/httpd/password student
#输入命令后输入两次密码,录入成功
#第一次使用,还没有文件,要带上选项-c
htpasswd /etc/httpd/passwd web
#已经有文件了,只要指定位置就行了

展示一个默认yum安装后的Apache主配置文件

1
2
3
4
5
6
7
8
9
10
11
12
13
14
15
16
17
18
19
20
21
22
23
24
25
26
27
28
29
30
31
32
33
34
35
36
37
38
39
40
41
42
43
44
45
46
47
48
49
50
51
52
53
54
55
56
57
58
59
60
61
62
63
64
65
66
67
68
69
70
71
72
73
74
75
76
77
78
79
80
81
82
83
84
85
86
87
88
89
90
91
92
93
94
95
96
97
98
99
100
101
102
103
104
105
106
107
108
109
110
111
112
113
114
115
116
117
118
119
120
121
122
123
124
125
126
127
128
129
130
131
132
133
134
135
136
137
138
139
140
141
142
143
144
145
146
147
148
149
150
151
152
153
154
155
156
157
158
159
160
161
162
163
164
165
166
167
168
169
170
171
172
173
174
175
176
177
178
179
180
181
182
183
184
185
186
187
188
189
190
191
192
193
194
195
196
197
198
199
200
201
202
203
204
205
206
207
208
209
210
211
212
213
214
215
216
217
218
219
220
221
222
223
224
225
226
227
228
229
230
231
232
233
234
235
236
237
238
239
240
241
242
243
244
245
246
247
248
249
250
251
252
253
254
255
256
257
258
259
260
261
262
263
264
265
266
267
268
269
270
271
272
273
274
275
276
277
278
279
280
281
282
283
284
285
286
287
288
289
290
291
292
293
294
295
296
297
298
299
300
301
302
303
304
305
306
307
308
309
310
311
312
313
314
315
316
317
318
319
320
321
322
323
324
325
326
327
328
329
330
331
332
333
334
335
336
337
338
339
340
341
342
343
344
345
346
347
348
349
350
351
352
353
354
#
# This is the main Apache HTTP server configuration file. It contains the
# configuration directives that give the server its instructions.
# See <URL:http://httpd.apache.org/docs/2.4/> for detailed information.
# In particular, see
# <URL:http://httpd.apache.org/docs/2.4/mod/directives.html>
# for a discussion of each configuration directive.
#
# Do NOT simply read the instructions in here without understanding
# what they do. They're here only as hints or reminders. If you are unsure
# consult the online docs. You have been warned.
#
# Configuration and logfile names: If the filenames you specify for many
# of the server's control files begin with "/" (or "drive:/" for Win32), the
# server will use that explicit path. If the filenames do *not* begin
# with "/", the value of ServerRoot is prepended -- so 'log/access_log'
# with ServerRoot set to '/www' will be interpreted by the
# server as '/www/log/access_log', where as '/log/access_log' will be
# interpreted as '/log/access_log'.

#
# ServerRoot: The top of the directory tree under which the server's
# configuration, error, and log files are kept.
#
# Do not add a slash at the end of the directory path. If you point
# ServerRoot at a non-local disk, be sure to specify a local disk on the
# Mutex directive, if file-based mutexes are used. If you wish to share the
# same ServerRoot for multiple httpd daemons, you will need to change at
# least PidFile.
#
ServerRoot "/etc/httpd"

#
# Listen: Allows you to bind Apache to specific IP addresses and/or
# ports, instead of the default. See also the <VirtualHost>
# directive.
#
# Change this to Listen on specific IP addresses as shown below to
# prevent Apache from glomming onto all bound IP addresses.
#
#Listen 12.34.56.78:80
Listen 80

#
# Dynamic Shared Object (DSO) Support
#
# To be able to use the functionality of a module which was built as a DSO you
# have to place corresponding `LoadModule' lines at this location so the
# directives contained in it are actually available _before_ they are used.
# Statically compiled modules (those listed by `httpd -l') do not need
# to be loaded here.
#
# Example:
# LoadModule foo_module modules/mod_foo.so
#
Include conf.modules.d/*.conf

#
# If you wish httpd to run as a different user or group, you must run
# httpd as root initially and it will switch.
#
# User/Group: The name (or #number) of the user/group to run httpd as.
# It is usually good practice to create a dedicated user and group for
# running httpd, as with most system services.
#
User apache
Group apache

# 'Main' server configuration
#
# The directives in this section set up the values used by the 'main'
# server, which responds to any requests that aren't handled by a
# <VirtualHost> definition. These values also provide defaults for
# any <VirtualHost> containers you may define later in the file.
#
# All of these directives may appear inside <VirtualHost> containers,
# in which case these default settings will be overridden for the
# virtual host being defined.
#

#
# ServerAdmin: Your address, where problems with the server should be
# e-mailed. This address appears on some server-generated pages, such
# as error documents. e.g. admin@your-domain.com
#
ServerAdmin root@localhost

#
# ServerName gives the name and port that the server uses to identify itself.
# This can often be determined automatically, but we recommend you specify
# it explicitly to prevent problems during startup.
#
# If your host doesn't have a registered DNS name, enter its IP address here.
#
#ServerName www.example.com:80

#
# Deny access to the entirety of your server's filesystem. You must
# explicitly permit access to web content directories in other
# <Directory> blocks below.
#
<Directory />
AllowOverride none
Require all denied
</Directory>

#
# Note that from this point forward you must specifically allow
# particular features to be enabled - so if something's not working as
# you might expect, make sure that you have specifically enabled it
# below.
#

#
# DocumentRoot: The directory out of which you will serve your
# documents. By default, all requests are taken from this directory, but
# symbolic links and aliases may be used to point to other locations.
#
DocumentRoot "/var/www/html"

#
# Relax access to content within /var/www.
#
<Directory "/var/www">
AllowOverride None
# Allow open access:
Require all granted
</Directory>

# Further relax access to the default document root:
<Directory "/var/www/html">
#
# Possible values for the Options directive are "None", "All",
# or any combination of:
# Indexes Includes FollowSymLinks SymLinksifOwnerMatch ExecCGI MultiViews
#
# Note that "MultiViews" must be named *explicitly* --- "Options All"
# doesn't give it to you.
#
# The Options directive is both complicated and important. Please see
# http://httpd.apache.org/docs/2.4/mod/core.html#options
# for more information.
#
Options Indexes FollowSymLinks

#
# AllowOverride controls what directives may be placed in .htaccess files.
# It can be "All", "None", or any combination of the keywords:
# Options FileInfo AuthConfig Limit
#
AllowOverride None

#
# Controls who can get stuff from this server.
#
Require all granted
</Directory>

#
# DirectoryIndex: sets the file that Apache will serve if a directory
# is requested.
#
<IfModule dir_module>
DirectoryIndex index.html
</IfModule>

#
# The following lines prevent .htaccess and .htpasswd files from being
# viewed by Web clients.
#
<Files ".ht*">
Require all denied
</Files>

#
# ErrorLog: The location of the error log file.
# If you do not specify an ErrorLog directive within a <VirtualHost>
# container, error messages relating to that virtual host will be
# logged here. If you *do* define an error logfile for a <VirtualHost>
# container, that host's errors will be logged there and not here.
#
ErrorLog "logs/error_log"

#
# LogLevel: Control the number of messages logged to the error_log.
# Possible values include: debug, info, notice, warn, error, crit,
# alert, emerg.
#
LogLevel warn

<IfModule log_config_module>
#
# The following directives define some format nicknames for use with
# a CustomLog directive (see below).
#
LogFormat "%h %l %u %t \"%r\" %>s %b \"%{Referer}i\" \"%{User-Agent}i\"" combined
LogFormat "%h %l %u %t \"%r\" %>s %b" common

<IfModule logio_module>
# You need to enable mod_logio.c to use %I and %O
LogFormat "%h %l %u %t \"%r\" %>s %b \"%{Referer}i\" \"%{User-Agent}i\" %I %O" combinedio
</IfModule>

#
# The location and format of the access logfile (Common Logfile Format).
# If you do not define any access logfiles within a <VirtualHost>
# container, they will be logged here. Contrariwise, if you *do*
# define per-<VirtualHost> access logfiles, transactions will be
# logged therein and *not* in this file.
#
#CustomLog "logs/access_log" common

#
# If you prefer a logfile with access, agent, and referer information
# (Combined Logfile Format) you can use the following directive.
#
CustomLog "logs/access_log" combined
</IfModule>

<IfModule alias_module>
#
# Redirect: Allows you to tell clients about documents that used to
# exist in your server's namespace, but do not anymore. The client
# will make a new request for the document at its new location.
# Example:
# Redirect permanent /foo http://www.example.com/bar

#
# Alias: Maps web paths into filesystem paths and is used to
# access content that does not live under the DocumentRoot.
# Example:
# Alias /webpath /full/filesystem/path
#
# If you include a trailing / on /webpath then the server will
# require it to be present in the URL. You will also likely
# need to provide a <Directory> section to allow access to
# the filesystem path.

#
# ScriptAlias: This controls which directories contain server scripts.
# ScriptAliases are essentially the same as Aliases, except that
# documents in the target directory are treated as applications and
# run by the server when requested rather than as documents sent to the
# client. The same rules about trailing "/" apply to ScriptAlias
# directives as to Alias.
#
ScriptAlias /cgi-bin/ "/var/www/cgi-bin/"

</IfModule>

#
# "/var/www/cgi-bin" should be changed to whatever your ScriptAliased
# CGI directory exists, if you have that configured.
#
<Directory "/var/www/cgi-bin">
AllowOverride None
Options None
Require all granted
</Directory>

<IfModule mime_module>
#
# TypesConfig points to the file containing the list of mappings from
# filename extension to MIME-type.
#
TypesConfig /etc/mime.types

#
# AddType allows you to add to or override the MIME configuration
# file specified in TypesConfig for specific file types.
#
#AddType application/x-gzip .tgz
#
# AddEncoding allows you to have certain browsers uncompress
# information on the fly. Note: Not all browsers support this.
#
#AddEncoding x-compress .Z
#AddEncoding x-gzip .gz .tgz
#
# If the AddEncoding directives above are commented-out, then you
# probably should define those extensions to indicate media types:
#
AddType application/x-compress .Z
AddType application/x-gzip .gz .tgz

#
# AddHandler allows you to map certain file extensions to "handlers":
# actions unrelated to filetype. These can be either built into the server
# or added with the Action directive (see below)
#
# To use CGI scripts outside of ScriptAliased directories:
# (You will also need to add "ExecCGI" to the "Options" directive.)
#
#AddHandler cgi-script .cgi

# For type maps (negotiated resources):
#AddHandler type-map var

#
# Filters allow you to process content before it is sent to the client.
#
# To parse .shtml files for server-side includes (SSI):
# (You will also need to add "Includes" to the "Options" directive.)
#
AddType text/html .shtml
AddOutputFilter INCLUDES .shtml
</IfModule>

#
# Specify a default charset for all content served; this enables
# interpretation of all content as UTF-8 by default. To use the
# default browser choice (ISO-8859-1), or to allow the META tags
# in HTML content to override this choice, comment out this
# directive:
#
AddDefaultCharset UTF-8

<IfModule mime_magic_module>
#
# The mod_mime_magic module allows the server to use various hints from the
# contents of the file itself to determine its type. The MIMEMagicFile
# directive tells the module where the hint definitions are located.
#
MIMEMagicFile conf/magic
</IfModule>

#
# Customizable error responses come in three flavors:
# 1) plain text 2) local redirects 3) external redirects
#
# Some examples:
#ErrorDocument 500 "The server made a boo boo."
#ErrorDocument 404 /missing.html
#ErrorDocument 404 "/cgi-bin/missing_handler.pl"
#ErrorDocument 402 http://www.example.com/subscription_info.html
#

#
# EnableMMAP and EnableSendfile: On systems that support it,
# memory-mapping or the sendfile syscall may be used to deliver
# files. This usually improves server performance, but must
# be turned off when serving from networked-mounted
# filesystems or if support for these functions is otherwise
# broken on your system.
# Defaults if commented: EnableMMAP On, EnableSendfile Off
#
#EnableMMAP off
EnableSendfile on

# Supplemental configuration
#
# Load config files in the "/etc/httpd/conf.d" directory, if any.
IncludeOptional conf.d/*.conf

发布于

2022-03-16

更新于

2024-08-07

许可协议

评论

:D 一言句子获取中...

加载中,最新评论有1分钟缓存...